Introduction
This document will demonstrate how to connect an OMRON NX102-1020 (database model) PLC to a MS SQL Server database. It will show you how to get started with programming the OMRON NJ/NX Database CPU UNITS to:
- Configure, connect and disconnect to a MS SQL Server Database
- Add entries
- Read entries
- Update entries
- Delete entries

Pre-Requisites
Installation of MS SQL Server 2019
For this document, MS SQL Server 2019 will be used locally on a PC with IP address 192.168.250.50.
Further Reading
OMRON NJ/NX Database Connection User's Manual
Procedure
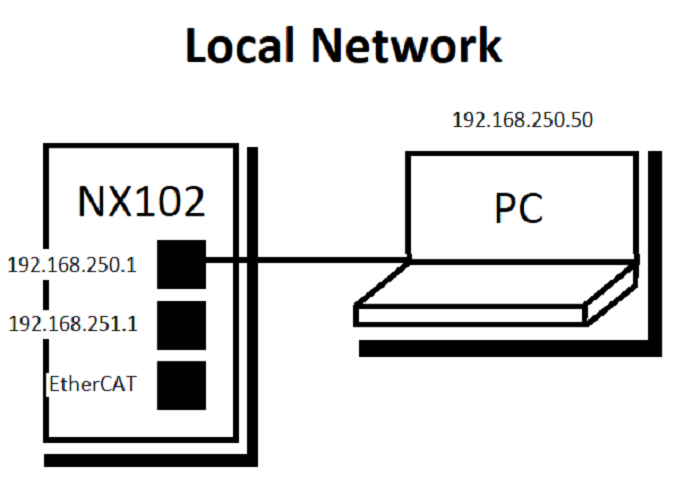
Step 1 - Setting the Networkle
In the multiview explorer, under Configurations and Setup -> Controller Setup -> Built-in EtherNet/IP Port Settings
Keep default IP address for the OMRON NX102-1020 PLC as :192.168.250.1

Step 2 - SQL Server Configuration
On the Windows PC open SQL Server Configuration Manager

Under SQL Server Services make sure SQL Server (SYSMACDEMO) and SQL Server Browser are both running.

Under SQL Server Network Configuration -> Protocols for SYSMACDEMO make sure TCP/IP is Enabled.

Run SQL Server Management Studio

Connect to your SQL Server in this case SYSMACDEMO

Once connected right click the server and go to Properties

Under Security, make sure Server Authentication uses SQL Server and Windows Authentication mode. Press OK.

Right click Database and add a New Database. Give the database a name in this case SysmacDB


Step 3 - Creating a Table using a New Query
Create a table named OmronDemoTable via a query on SQL Server Management Studio. The table will consist of:
⦁ Product_ID of type INT
⦁ Product_Name of type varchar(50)
⦁ Product_Quantity of type INT
⦁ Batch_Date of type datetime
⦁ Discontinued of type bit
Highlight Tables and add a New Query (Ctrl + N).

Add the following code to create the table with the listed columns and data types then click Execute to run the query to create the table.

In the Object Explorer window click on the refresh button, this will refresh the SysmacDB to include the newly added dbo.OmronDemoTable.

Step 4 - Register the OMRON NJ/NX MAC as a MS SQL User
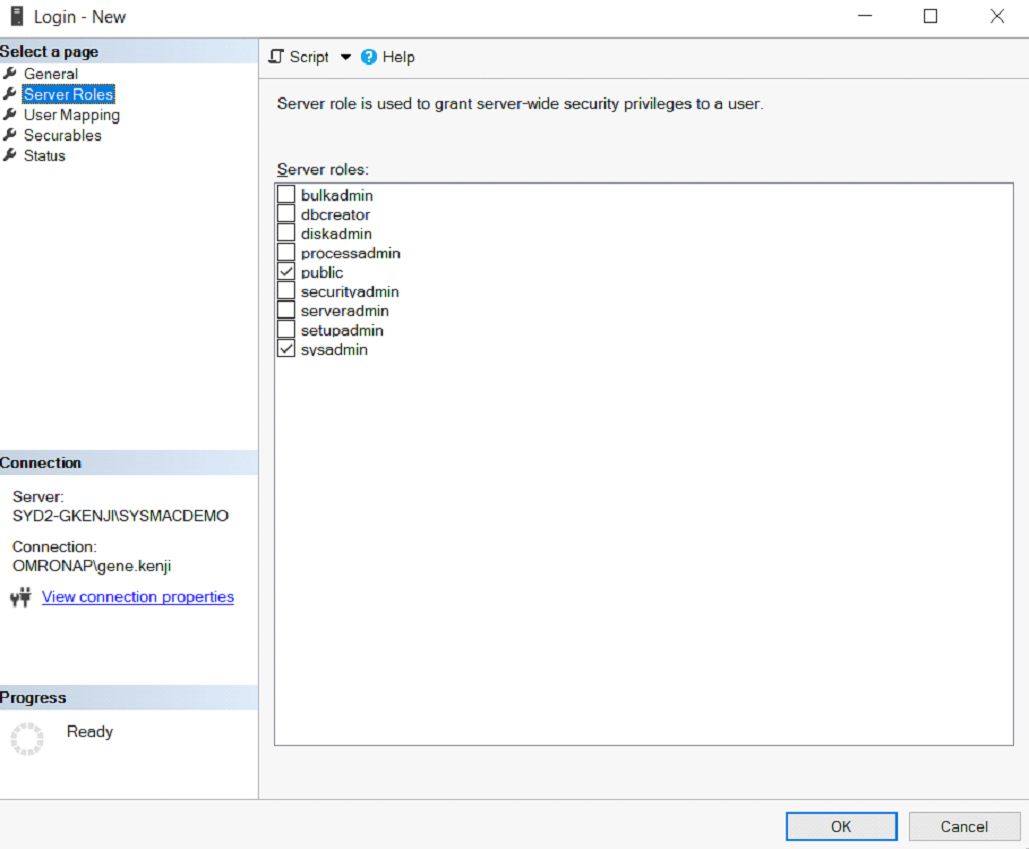
In the Object Explorer Window under Security -> Logins, right click and add a New Login.
Under General:
Login name: OmronNX102
SQL Server Authentication (selected):
Password: Omron_DB1
User must change password at next login: unticked
Default database: SysmacDB

Under Server Roles, ensure public and sysadmin boxes are ticked.
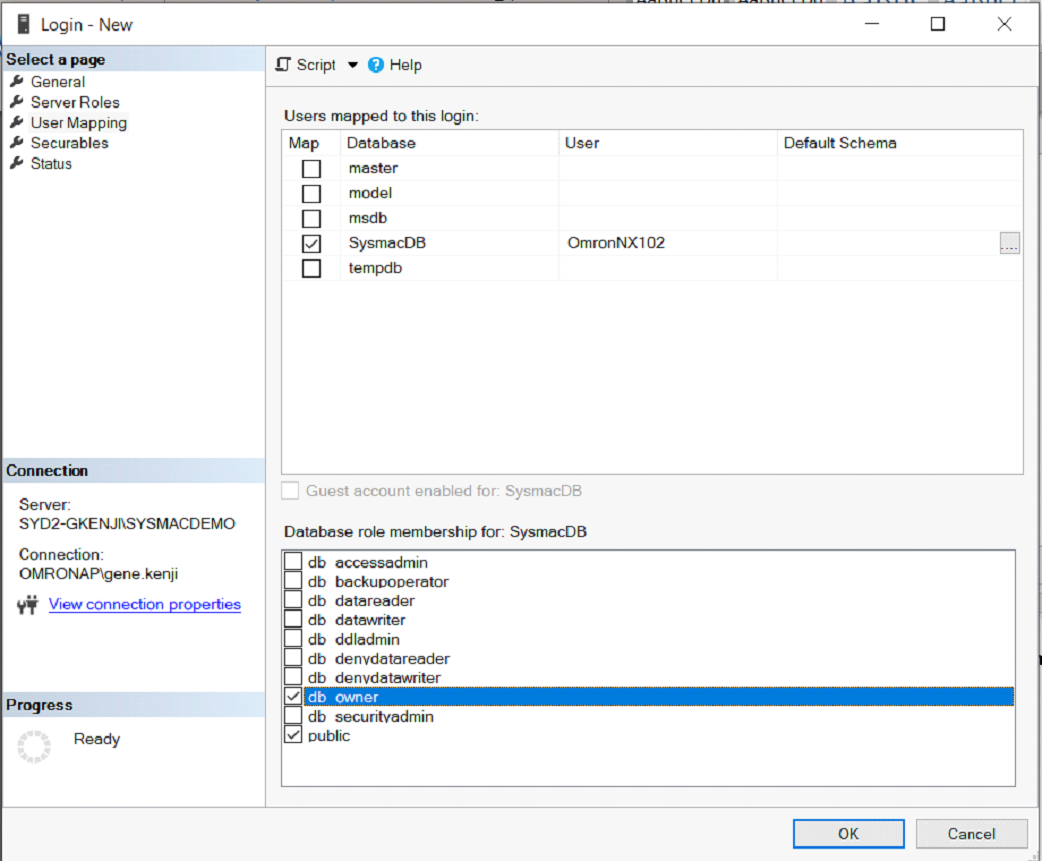
Under Users Mapping, tick the SysmacDB Map box and under Database role membership for: Sysmac DB, make sure db_owner and public are ticked. Click OK
Step 4 - NJ/NX Database Connection Configuration
In Sysmac, in the multiview explorer pane - under Configurations and Setup -> Built-In EtherNet/IP Port Settings, set the IP of Port 1 to 192.168.250.1 (default)
 Under Host Connection Settings -> DB Connection, right click DB Connection Settings -> Add and rename to DemoDB.
On the newly added DemoDB connection, under Connection Settings:
| Parameter | Setting |
|---|---|
| Database Type | SQL Server |
| Server Specification Method | IP Address |
| IP Address | 192.168.250.50 (IP address of the PC with the server on it) |
| Instance name/Port No | SYSMACDEMO (name of the server) |
| Service name/Database name | SysmacDB |
| Username | OmronNX102 |
| Password | Omron_DB1 |
Submit the changes. Go online from the top menu tab Controller -> Online then Controller -> Synchronize then click Transfer to Controller. Ensure there are no errors.

Step 5 - NJ/NX and MS SQL Connection Test
Stay online, under the connection settings of DemoDB, click on Communications Test button. If all is configured correctly, Test OK will show

Step 6 - Programming - Structure Creation to Mirror MS SQL Table
The OmronDemoTable structure will need to be created on the Sysmac platform in order to read, write and update the table on the MS SQL Database.
To commence programming work offline Controller->Offline. In the multiview explorer pane. Under Programming->Data->Data Types, select Structures and add a new structure named OmronDemoTable.
Using the table below from section 3-5 of the OMRON NJ/NX Database Connection User's Manual match the members added with the corresponding data types. For example, Product_Name varchar(50) (SQL Server) translates to Product_ID STRING[50] (Sysmac).
 Section 3-5 Data Types Conversion in MS SQL to OMRON NJ/NX Controllers

Step 7 - Programming - CONNECT to the Database
Under Programming -> POUs -> Programs -> Program0 -> Section0 add a global contact B_DB_CONNECT, add an inbuilt contact _DBC_Status.Run then add the function block DB_CONNECT with an instance name DB_CONNECT_FB. Fill the ‘DBConnectionName’ field in DB_CONNECT_FB with ‘DemoDB’ the name of the database connection and fill the ‘DBConnection’ with.

_DBC_Status.Run is an inbuilt flag that monitors the run status of the MS SQL Server. When the database is running _DBC_Status.Run and B_DB_CONNECT is activated, the DB_CONNECT_FB function block is executed. The OMRON NX102 MAC connects to the SQL Server as DemoDBConnection once the Done bit is active. Be sure to highlight the FB and press F1 for the function block reference.

Step 7 - Programming - MAPPING for INSERT and UPDATE
Once the DB_Connect FB has completed it will execute the DB_CreateMapping (DB_INSERT_MAP_FB) FB of type INSERT.
This uses the current DemoDBConnection, looks at the OmronDemoTable on the SysmacDB (database) on the SQL Server and maps the INSERT variables to DB_MAP_VAR_INSERT which is of STRUCT OmronDemoTable type.

After the Done bit of DB_INSERT_MAP_FB add the following code:

Similar to DB_INSERT_MAP_FB, but instead DB_UPDATE_MAP_FB. The MapVar will be DB_MAP_VAR_UPDATE of STRUCT type OmronDemoTable and the SQLType will be of UPDATE type.
Add another DB_CreateMapping FB but this time for SELECT. Make sure the MapVar of DB_SELECT_MAP_FB is a global variable and an array type. To be more specific it needs to be an ARRAY[0..999] OF OmronDemoTable – an array of the OmronDemoTable struct.

DB_MAPPING_DONE is added at the end as a flag signalling all mapping is done.

Step 7 - Programming - INSERT Data Into the Database
Add a new rung and create a trigger that will map variables to the DB_MAPVAR_INSERT STRUCT. The trigger will also add the mapped variables as a new entry (row) to the OmronDemoTable in the database.
Add a second rung to execute the DB_Insert FB once mapping has completed (DB_MAPPING_DONE)

Test the code by going online, transferring to the controller, CONNECT to the database by making B_DB_CONNECT true.
In this example the following values were added for new_Product_ID: 24 and new_Product_Name: NX102 etc.
PB_DB_INSERT was set to true which mapped the new_XXXX variables to the DB_MAP_VAR_INSERT struct. The DB_INSERT_FB uses that same struct to write or INSERT a new row of data to the table in the database.

In SQL Server Management Studio, right-click the dbo.OmronDemoTable and select TOP 1000 rows. The newly added row can be seen in the database


Step 7 - Programming - UPDATE Data in the Database
Add the following code seen below

The DB_Update FB is similar to DB_Insert, the difference is that in order to update an entry the FB needs to know which entry to update. The Where parameter is a STRING that is used as a condition to find the entry. In this example we will update the recently inserted entry by changing the DB_UPDATE_COND (Where condition) to Product_ID = 24.
Test the code online after transferring to the controller. In this example, new_Product_ID was changed to 11 with the product name NJ501, quantity of 22, the current date/time and true for discontinued. The Where parameter was set with STRING Product_ID = 24. Once PB_DB_UPDATE is activated, it will execute the function block – look into the database for entries that matches the Where or DB_UPDATE_COND(ition), in this case it will be the recent INSERT and then change or UPDATEs it to the values set in the DB_MAP_VAR_UPDATE STRUCT.

Re-execute the query for SELECT TOP 1000 rows in SQL Server Management Studio to see the updated entry.

Step 8 - Programming - SELECT (read) Data in the Database
Please add and follow the code below.

Where is the condition used to find and read the entries that satisfy this condition. For example Product_ID > 0 would list all the entries with Product_ID great than 0 (all entries). Sort will show the data in a specific way. For example Product_ID ASC would show all entries satisfying the Where condition from lowest Product_ID number to the highest - ascending order.
The entries that satisfy the Where (DB_SELECT_COND) will store the entries into the DB_MAP_VAR_SELECT array.
For an online test example, add a few INSERT (entries) into the database and view them on SQL Server Management Studio.

While online set DB_SELECT_COND to Product_ID > 0. This will list all entries as we do not have any starting with 0.
Set DB_SELECT_SORT to Product_ID ASC. When the PB_DB_SELECT is triggered those four entries will map themselves into the DB_MAP_VAR_SELECT array. Using the Watch Table, View -> Watch Tab Page(Table) four entries will show in ascending order from element 0 to 3.

Step 9 - Programming - DELETE (remove) Data in the Database
Add the following code below.

DB_Delete will delete an entry of a specified table, in this case (OmronDemoTable) depending on the Where condition (DB_DELETE_COND).
To test this online, set DB_DELETE_COND to Product_Name = $’CP1L$’ in order to delete the third entry.

Once PB_DB_DELETE is triggered the entry containing CP1L as the Product_Name is deleted from the OmronDemoTable.

Step 10 - Programming - CLOSE connection to the Database
Once finished with the database, close the connection using the DB_Close FB.

Summary
The OMRON NJ/NX Database CPU Controllers have the capability of storing data onto databases such as Microsoft's SQL Server.
This guide has demonstrated the OMRON NJ/NX Database CPU UNITS capability to:
- Configure, connect and disconnect to a MS SQL Server Database
- Add entries
- Read entries
- Update entries
- Delete entries